Dialogic install under Windows 2000
The following screen shots indicate the typical installation
and configuration sequence for the Dialogic System Release
5 software under Win 2000.
NOTE: These instructions are offered as a guide only. Please
contact Dialogic for additional information and any changes.
Please be aware that these instructions represent just one
install method and may not be suitable for all machines
and software configurations.
********************************************************
Section 1: Install the hardware
********************************************************
Install ISA Dialogic Card
Dialogic ISA voice cards have jumper switches for setting
the hardware interrupt level (IRQ) and base memory address
segment. When fitting these Dialogic voice cards, it is
essential to choose a hardware interrupt level and base
memory address segment that do not conflict with existing
equipment installed in your PC.
How to check for un-allocated IRQ and memory on
Windows NT:
From the Start menu, select Programs, then Administrative
Tools, then Windows NT Diagnostics.
Press the Resources tab.
Press the IRQ button to view currently allocated IRQs.
Press the Memory button to view currently allocated segments.
How to check for un-allocated IRQ and memory on
Windows 2000/XP:
From the Start menu, select Programs, then Accessories,
then System Tools, then System Information.
Expand the Hardware Resources folder.
Press the IRQs folder to view currently allocated IRQs.
Press the Memory folder to view currently allocated segments.
Having identified suitable free IRQ and memory address,
configure the card by setting the jumpers and switches located
on the card. IRQ 5 is usually a good choice, the base memory
address can usually be left at the default D000.
1) After fitting the Dialogic ISA voice card, re-start
the PC.
2) Start the Dialogic Configuration Manager: From the Start
menu, select Programs, then Dialogic System Software, then
Dialogic Configuration Manager.
3) Connect to the local computer.
4) Auto card detection will begin.
5) The ISA card will not be auto detected. Select Add-Device
from the Action Menu.
6) Select the voice card model.
7) Give the voice card a name or number.
8 ) Setup the correct IRQ and memory values. (May need to
double-click on the displayed voice card icon first)
9 ) Set the country parameter to the correct value.
10) Select Start-Service from the Service menu. The service
will take up to 30 seconds to start.
11) From the Service menu, select Startup-Mode, then Automatic.
Install PCI Dialogic Card
Dialogic PCI voice cards have a small rotary switch (on
the circuit card), which sets the board number. If this
is the first Dialogic voice card in the PC, set the board
number to 1. Plug the Dialogic voice card into any available
PCI slot on the PC mother board.
1) After fitting the Dialogic PCI voice card, re-start
the PC. The "Found New Hardware Wizard" will be
displayed. Press Next.
2) Select the "Search for a suitable driver" option.
3) Select only the "Specify a location" option.
4) Browse to the Dialogic installation directory's \DRVR\
subdirectory, Press Next.
5) The correct Dialogic card name should be displayed. Press
Finish.
6) Start the Dialogic Configuration Manager: From the Start
menu, select Programs, then Dialogic System Software, then
Dialogic Configuration Manager.
7) Connect to the local computer, auto card detection will
begin.
8) Check if the voice card has been auto-detected.
9) Double click on the voice card icon and set the country
parameter to the correct value.
10) Select Start-Service from the Service menu. The service
will take up to 30 seconds to start.
11) From the Service menu, select Startup-Mode, then Automatic.
If the card is not detected, or the model is displayed
as ????, do the following:
Reboot the PC
Enter the system BIOS
Disable "Plug & Play" and/or disable ACPI
Repeat steps 7 to 9 above
********************************************************
Section 2: Install Dialogic Software
********************************************************
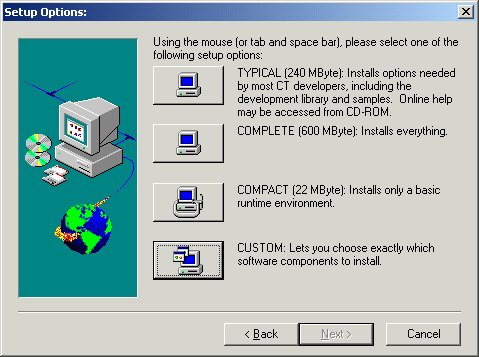
1) Run the Dialogic SR5 program and select the "custom"
installation option.
********************************************************

2) Make certain that the TAPI component of the Dialogic
drivers is selected as part of the install.
3) Select "GlobalCall" (This will set the software
to use GlobalCall but does not install all of the GlobalCall
software. You must remember to install GlobalCall separately
below. )
4) For Analog cards for each of the next two dialog boxes,
select no options
For digital cards (i.e. T1, E1) Consult the
Dialogic documentation for the correct options for your
installation. (Please use T1 robbed bit as it does not appear
that PRI supports TAPI. If you will be using the SC Bus
to connect multiple cards together then you will need to
select the SCx option also.)
5)Complete the installation
6) Reboot
********************************************************
Section 3: Configuring the Dialogic Drivers
********************************************************
Start "Dialogic Configuration Manager (DCM)"
from the Start Menu. The first time you run DCM, you may
see a "computer name" dialog box. Select "local"
and hit the "connect" button. Once DCM is up:
When using an ISA board (or board with jumpers):
1) Select the menu option "Action | Add Device"
2) Select your Dialogic board
3) Set the Address and IRQ to match the setting on the hardware.
4) See "Installing the Dialogic Hardware"
5) Select the menu option "Service | Startup Mode | Automatic"
6) Close Dialogic Configuration Manager
7) Reboot the computer.
When using a PCI board (or board with NO jumpers):
The Dialogic board should automatically be detected and
be on your screen
1) Select the menu option "Service | Startup Mode |
Automatic"
2) Close Dialogic Configuration Manager
3) Reboot the computer.
Note: After that, you can run one of the Dialogic Sample
Programs such as "Multi-Threaded Voice" or "Synchronous
Multi-threaded" to verify that the board is installed
properly.
****************************************************************
Section 4: Installing Service Pack
1 (SP1)
****************************************************************
1) Check the link below for the latest service pack: http://resource.intel.com/telecom/support/releases/winnt/Sr511/index.htm.
2) Download the latest service pack.
3) Run setup to install.
4) Then reboot again.
****************************************************************
Section 5: Installing
and Configure GlobalCall
(Only if using digital cards)
****************************************************************
Installing GlobalCall
NOTE: Checking GlobalCall in the main software setup above
just selects the option to use GlobalCall. Both of these
steps are important. You must install the GlobalCall software
separately here.
http://resource.intel.com/telecom/support/releases/protocols/GCProtocols30/index.htm
1) Run Setup
2) Click on Custom
3) Select your location. In the US that would be North American
protocols.
4) Also select online documentation
5) Select All protocols (US and Mexico)
6) Click OK on through
7) Restart again
Configure GlobalCall
1) Use Notepad to edit "ProgramFiles\Dialogic\Cfg\icapi.cfg"
2) Edit the line for parameter $14 to look like this:
$14 Disable DTI Wait call function ( 1=YES, 0=NO
) : 1
You may also edit parameter $11 and change the "0"
to a "1" to enable debug logging. But remember
to turn it off when you get things working!
3)Save and close
For Wink Start:
1) Use Notepad to edit "Program Files\Dialogic\data\SPANDTI.PRM"
Find the line with the string ";000C", remove
the semicolon and change it to be "000C 30"
Go to the end of the file and append the following 2 lines:
0014 01 ; ESF framing
0020 01 ; B8ZS
2) Save and close
3) Open the Dialogic Configuration Manager (DCM) and stop
services if they are running
4) Select the board you wish to configure and repeat for all
boards
5) Select the "misc" panel
6) Click on ParametersFile
7) Under the value, enter "spandti.prm"
****************************************************************
Section 6: Configuring the Dialogic TSP
****************************************************************
1. Run the Telephony applet in the Control Panel:
A. Click Start.
B. Point to Settings.
C. Click Control Panel.
D. Double-click Telephony.
Note: For Windows 2000/XP, click the Phone and Modem options
icon.
2. Click the Telephony Drivers tab. (Note: For Windows 2000/XP, select the Advanced tab.)
3. If the Dialogic Service Provider for NT does not appear
in the Telephony Drivers tab, do the following to add it:
A. Click Add to display the Add Driver dialog.
B. Click the Dialogic Generation 2 Service Provider for
NT to select it (if it is not shown, restart your PC and
try again).
C. Click Add. The Dialogic TAPI driver (TSP) Configuration
dialog is displayed.
4. Click Detect Boards to update the list of Dialogic board
channels (dxxxB1C1 is board 1 channel 1). The list is updated
to match the configuration that was most recently started.
You can click Help to access on-line help for the TSP configuration.
5. Click on the "Advanced" button causing
the "Configuration Service" dialog box
to appear. It allows setting of the the number of rings
after which the call should be reported, definition of disconnect/busy
tones which are used by your telephone network, and the
commands used by the PBX to transfer calls correctly. For
more information please see also: Call
parameters configuration, Configuring Call Transfers and Conferencing and Disconnection
Detection
6. Click OK to close the Dialogic TSP Configuration dialog.
After installation use the Dialogic Configuration Manager
to configure and start the board.
****************************************************************
Section 7: Installing the Dialogic TAPI Wave
Driver
****************************************************************
1) Go to the Start Menu->Settings->Control Panel->Add/Remove
Hardware to start the Add/Remove Hardware Wizard
Click Next.
2 ) Select Add/Troubleshoot a Device and click Next.
Windows will attempt to find any new plug and play devices.
It should find none. Select "Add a new device"
and click Next.
3) Select "No, I want to select the hardware from a
list" and click Next
4) Select "Sound, video and game controllers"
and click Next
5) Click "Have Disk" and browse to the "Program Files\Dialogic\LIB"
directory.
6) "Select the "Oemsetupfile" and click open.
Then click OK on the next screen.
7) Select the "Dialogic WAVE driver 1.X" and click
Next.
8) Click Next. You will receive a warning that a digital
signature is not found. Click Yes to continue the installation.
If asked for path to "dlgwave.dll" it should be
found in Windows' "System32" directory, else it
is also available in the "Program Files\Dialogic\LIB"
directory.
9)Restart the computer for the changes to take affect
See here for step-by-step
guide with screenshots.
Note: The default wave format in our demo samples
is PCM, 16bits, 8kHz, Mono which may not work in some
of the Dialogic cards. If so, please use the PCM,
8bits, 11Khz, Mono wave files that many Intel / Dialogic
cards support natively. Download our wave file in
this format at 11khz8bitsmono.
The old cards such as ProLine/2V, D/41E, D/41ESC, D/21D,
D/41D, D/21H, D/41H only support wave files in u-LAW,
8kHz, 8bit, Mono format, so please using these
wave files in "demo\wave_u-law"
directory instead of the "demo\wave_pcm".
|

